WMS

Exporting a High-Resolution Plot

While working in WMS, you may need to export a profile plot or hydrograph at a high resolution. This can be particularly useful when preparing a presentation or sending the results of your project for publication. Having a high resolution plot allows presenting your work at its best. This blog post is meant to show you how to export a high-resolution profile plot in WMS.

The needed resolution of the plot or hydrograph will vary depending on the final output. Resolution for screens and powerpoint presentations does not need to be as high as for print publications. By default, WMS uses a lower resolution for hydrographs and plots to conserve computer processing power. When exporting, higher resolutions can be specified.

In order to export a high resolution plot, a profile plot or hydrograph needs to be created. After generating the profile plot or hydrograph, the below steps will show how to export it with a high resolution.

  1. Right-click on the plot window and select Export/Print.
  2. In the Exporting Profile dialog, select which file type to export and where to save the file.
  3. At the bottom of the dialog, there is an option to set the size and resolution of the file to make it a higher quality image.
Exporting a plot

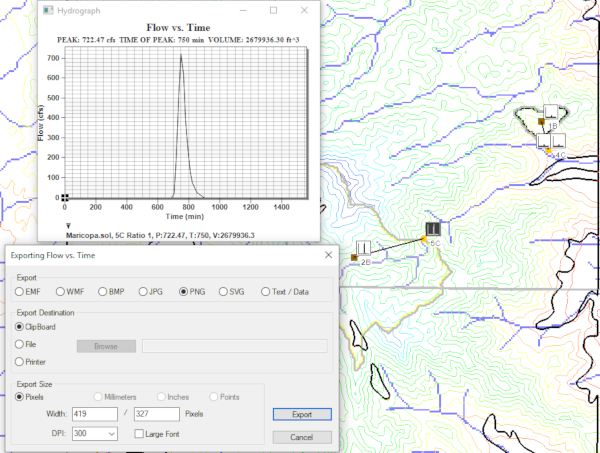
Remember that, in changing the size of an image, there are limits to how large the image can be. Each image should be scaled to accurately fit within its limited dimensions.

It is recommended to check the export plot file after exporting. It is recommended to open the exported plot file in software outside of WMS to check the resolution. Also review the final file size before sending it. If there is a discrepancy, adjust the export settings in WMS and try again.

Try out exporting your plots and hydrographs from WMS today!

Blog tags: 

Obtaining DEM and TIN Data in WMS

For many watershed modeling projects, having the correct DEM or TIN can make a huge difference. Importing a DEM or TIN into WMS can be done in any of a few ways.

The easiest way to obtain a DEM or TIN is to import a file from your computer directly into your project. This can be done using any of the methods for opening a file: the Open command, drag-and-drop, etc.

Once your DEM or TIN file is in WMS, check to make certain it is in the correct module. In order for WMS to make use of DEM or TIN, it often needs to be in the Terrain Data module. Sometimes, a DEM or TIN will be imported as a raster file or scatter set. In order to fix this, the DEM or TIN needs to be converted.

  • When imported as a raster file, right-click on the raster file in the Project Explorer and select Convert To | DEM. Then select the resample size for the DEM.
  • When imported as a scatter set, right-click on the scatter set in the Project Explorer and select Convert | Scatter Points to TIN.

Once the data has been moved to the Terrain Data module, it can be moved from a TIN to DEM or a DEM to TIN as needed. This is done by right-clicking on the DEM or TIN and using the Convert commands.

Converting a DEM to a TIN

Knowing how to convert data to be either a DEM or TIN in the Terrain Data module allows you to make use of the Import from Web and Online Maps functions in WMS to obtain DEMs and TINs. Other data sources can be used, when available.

A DEM can also be obtained when using the Hydrologic Modeling Wizard. In the Download Data step, elevation data can be downloaded that will automatically be placed in the Terrain Data module as a DEM.

Make use of DEMs and TINs in your watershed modeling using WMS today!

Blog tags: 

Using Command Line Switches for the XMS Installer

If you work as a system administrator or in an IT department, you may need to know how to install GMS, SMS or WMS silently or with less visibility. Fortunately, we have a few options for this.

Previously we have discussed performing a silent install of XMS, this article will discuss options that run as command line switches. For example, when running the WMS 11.0.5 installer with no UI, you will enter the command "wms11.0.5full64bit.exe/qn" through cmd.

When installing XMS, you have the following parameters you can set:

full UI: /qf

This is the default parameter used by the installer. This means that the end user will see the full installation wizard the same way they would by running it through Windows Explorer.

reduced UI: /qr The user interface does not show any wizard dialogues.

This is a form of automatic installation that will skip all wizard dialogues, though you will still see a full UI showing that WMS is being installed.

basic UI: /qb Only a progress bar will be shown during the installation

Command line install progress bar

This option is similar to /qr but, instead of showing the full UI from our installer, it shows a progress bar with default Windows installer decorations. This takes less screen real estate while still giving you visibility into the installation process.

no UI: /qn No UI will be shown during the installation.

This option does not show any UI at all, instead opting to run the install progress in the background. This is ideal for if you are installing the software on a computer that's currently in use and don’t want to interrupt the work currently being done.

Current versions of XMS software can be found on Aquaveo's downloads page.

Blog tags: 

4 Ways to Screen Capture in WMS

Are you needing to capture a screenshot of your WMS model? Fortunately, there are multiple ways to get a screenshot from WMS. This blog article will discuss four methods for using screen capture in WMS; two that use built-in Microsoft Windows capabilities and two that make use of the innate capacity of WMS.

Windows Methods

Microsoft Windows has a couple of innate methods for making a screen capture. One way is to use the Print Screen command found on the keyboard. This command will copy an image of the WMS screen into the computer's memory where the image can later be pasted into another program. Holding down the Alt key while using the Print Screen command method will limit the image to just the WMS interface if it is in the active window. This method, however, has one disadvantage considering that the captured image often needs editing.

Another method is to use the Snip tool. This tool initiates dragging a rectangle around the WMS interface. Like the Print Screen key, this saves the image in your computer’s memory which later needs to be pasted into a seperate program. This method has the advantage of allowing you to get a cropped version of the image.

Neither of the screen capture methods using the native Windows tools directly results in a usable image file.

WMS Methods

Using the WMS screen capture methods, a usable image file can be easily obtained. The Save As command and the Screen Capture command both create an image file that contains exactly what is displayed in the Graphics Window at the time the file is saved. This can help avoid having to copy and edit the image in a graphics software program.

To use the Save as command, go to File | Save As. In the Save As dialog, change the file type to be "JPEG Image File (*.jpg, *.jpeg)".

To use the Screen Capture command, make the GIS module active. Use the Image | Screen Capture command. In the save dialog that appears, save out the screen capture as a bitmap image.

Screen Capture command

Try out the screen capture capabilities of WMS today!

Blog tags: 

Pages