WMS

Importing and Exporting Shapefiles

If you have data in GMS, SMS, or WMS that needs to be shared with another application, one of the easiest ways to share this data is through shapefiles. GMS, SMS, and WMS can all import and export shapefiles, though there are some differences between them. This article goes over some of those differences.

Importing Shapefiles

When you import shapefiles into GMS, SMS, or WMS, they will be loaded under the GIS module. Shapefiles can be imported just like any other file using the File | Open command, the Open File macro, or dragging the file icon on the interface. From there, you can use the conversion commands to move the shapefile data into other modules.

Exporting Shapefiles

Though GMS, SMS, and WMS have a lot of similarities they each vary from the other when it comes to saving a shapefile. In general DEMs, TINs, feature objects, and grids can be saved through the right-click menu in GMS; the file menu in SMS; and through both the right-click menu and file menu in WMS.

GMS
Export command

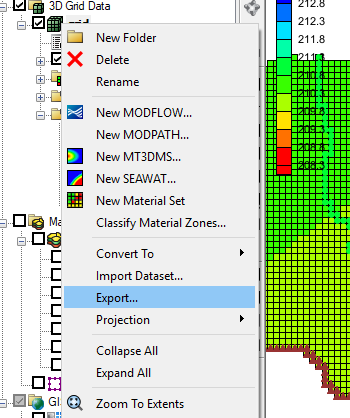
Shapefiles can be exported through the right-click menu.

  1. Right-click on the item in the Project Explorer and select Export to bring up the Export dialog.
  2. In this dialog you can change the "Save as type" to "Shapefile (*.shp)".

The following items can be exported as shapefiles.

  • TINs
  • 3D Grids
  • Feature Objects
  • DEMs
SMS

Shapefiles can be exported through the File menu.

  1. Select the item in the Project Explorer, then File | Save As to bring up the Save As dialog.
  2. In this dialog you can change the "Save as type" to "Shapefile (*.shp)".

The following items can be exported as shapefiles.

  • Scatter Sets
  • 2D Grids
  • Feature Objects
  • Raster Files
WMS

Shapefiles can be exported through the right-click menu and through the File menu.

  1. Select the item in the Project Explorer, then File | Save As to bring up the Save As dialog.
  2. In this dialog you can change the "Save as type" to "Shapefile (*.shp)".
  3. Alternatively, you can right-click and select Save As to bring up the same dialog.
The following items can be exported as shapefiles.
  • TINs
  • 2D Grids
  • Feature Objects
  • DEMs

Now that you know a little more about using shapefiles in XMS, try using them in your GMS, SMS, or WMS projects today!

Blog tags: 

Understanding Projections vs. Reproject

Have you ever wondered what the difference between projection and reprojection is? Have you ever needed to convert a projection from one type to another in GMS, SMS, or WMS (collectively known as XMS)? The use of projections in WMS can be confusing, so the following should provide further clarification.

Specifying Projections

Projections can be associated with individual data objects, either in the object data file itself or in an associated *.prj file. If XMS cannot find a projection, the object will be left as "no projection," or, when new objects are created, XMS will assign the display projection to it. You can specify an object's projection by right-clicking on it and selecting Projection. Note that this projection must be the same as the original projection of the data; specifying an incorrect projection will result in data issues.

Reprojecting on the Fly

"Reprojecting on the Fly" occurs when datasets or objects from multiple projections are loaded into a project, where the x and y values would not otherwise overlap (i.e., the data would be displayed in two or more distinct locations). The different projections for these data will be "reprojected on the fly" to match the display projection such that the data objects will line up. Note that this does not change any *.prj files or the projections that are set for each object; it is an automatic function internal to XMS used for display purposes.

Converting a Projection

If you need to convert from one projection to another, this can be done by right-clicking on it and choosing Reproject. To use this command, the data must first have the correct projection specified. After choosing Reproject, the command will prompt the user to select a new projection, the data will be converted to the selected projection. If a *.prj file is associated with the object (such as a TIFF), reprojecting the object will change the *.prj file. Reprojection on the fly is usually sufficient for most applications. Please note that there are some limitations for reprojecting.

Reporject Dialog Example

Once the datasets are referencing their projection correctly, XMS should reproject them on the fly to match your display projection. If you don't have a display projection set, you can do so by selecting the Display menu and choosing Projection. At that point, if you would like to reproject your scatter(s) into the same projection as the display projection, you would be able to do so.

Now that you see the differences between projection vs. reproject try them out in XMS today!

Blog tags: 

Working with Large DEMs

Do you have a project that requires using a large DEM? Digital Elevation Model files are a great source for terrain data in WMS. A lot of projects require using DEMs which makes it important to use the data available.

Using a large DEM file can present some complications in WMS. A large file may cause the program to slow down or have difficulty processing. So it is important to make certain to use a DEM that contains mostly relevant data and doesn’t contain an excess of nonessential information.

But how do you know if the DEM data you are pulling is enough? Is more watershed data always better?

Example of DEM in WMS with contours turned on.

Pulling in more data doesn’t insure better results. Though WMS is able to handle a massive amount of data (which is not a guarantee) the hardware in your computer may not be able to handle it. In general, a DEM twice the size of your watershed is probably sufficient for most models. More than twice your watershed size tends to just bog down the model causing you to face unnecessary wait times.

What should you do if your watershed data is not loading?

If your data is taking a long time to load try adjusting the resolution. After using the Get Data from Map tool, and making your selection in the Data Service Options dialog, you will be able to select your desired resolution in the Zoom dialog. Selecting a lower resolution zoom level should make the DEM easier to work with in WMS.

You could also try breaking up the DEM into multiple DEMs. That way your computer is not overwhelmed by trying to download one huge file all at once. Then while you’re working on your model you can turn on just the DEM(s) you need.

Third party software can be used to break up the DEM or reduce the resolution.

DEMs remain an excellent source for data for projects in WMS. Download WMS today!

Blog tags: 

Aquaveo User Conference 2019

The 2019 Aquaveo User Conference is going on now. It started yesterday, October 8th, and will wrap up today, October 9th. We are enjoying meeting with users from around the world. In attendance are users from the United States, Germany, Portugal, South Africa, and other places around the globe.

At the conference, we announced some of the new features and upcoming changes to our products that we are excited about:

  • Making XMS functionality available for use outside of the traditional interface.
  • More web-based applications for portability and ease of access.
  • Simplifying and unifying tools so it is easier to find and use the functionalities available.
  • Project management tools to track the history of a model.
  • 3D bridge modeling in SMS.
2019 Aquaveo User Conference

Talking to those in attendance, we learned they enjoyed:

  • Learning more about software features and functionality.
  • Learning how to improve their model development process.
  • Discovering benefits of Aquaveo’s software over other software.
  • Talking to developers and learning tips for model development.
  • Being able to show off their models and receive feedback on them.
Eva Loch presenting at the 2019 Aquaveo User Conference

We’d like the thank the following for participating during our user conference:

If you couldn’t make it to the Aquaveo User Conference this year, watch our website and Facebook page for future conferences.

Pages