SMS

Merging Map Coverages in SMS

Do you have an SMS project that might benefit from merging coverages together? It’s not uncommon to have feature objects on different map coverages in SMS that would be useful to have on one coverage. For example, you might have feature objects from a shapefile on one coverage that you would like to merge with feature objects you have created on another coverage. This post will cover some tips to merge coverages as well as the effects of merging coverages.

To merge map coverages:

  1. Select one coverage in the Project Explorer then hold down the Ctrl key and select another coverage.
  2. Next right-click and the Merge Coverages command will appear.
  3. After clicking the Merge Coverage command, a warning dialog will ask you if you want to keep or delete the coverages being merged.
  4. Upon completion a new merged coverage will appear in the Project Explorer.
Example of Merging Map Coverages in SMS

Merging coverages comes with a lot of benefits when working with a large number of feature objects. When merging coverages here are a few items to keep in mind:

  • When merging coverages of different types, the new merged coverage will be converted to the Area Properties type.
  • When merging coverages of the same type, the new merged coverage will be the same type. For example, if you had two map coverages that are both ADCIRC materials they are going to remain ADCIRC Materials after they have been merged together.
  • When merging, only the feature objects will be merged together–any defined attributes on the feature objects will be reverted to the default setting for that coverage type. For example, the default for SRH-2D boundary conditions coverage type is the wall boundary condition. When two SRH-2D boundary condition coverages are merged all the arcs will be set to have the wall attributes.
  • When only wanting to copy a few feature objects from one coverage to another, use the Copy to Coverage feature instead of merging entire coverages.

These are just a few tips to help with merging coverages in SMS. Try out merging coverages in SMS 13.2 today!
Blog tags: 

Comparing SRH-2D and HEC-RAS Solutions

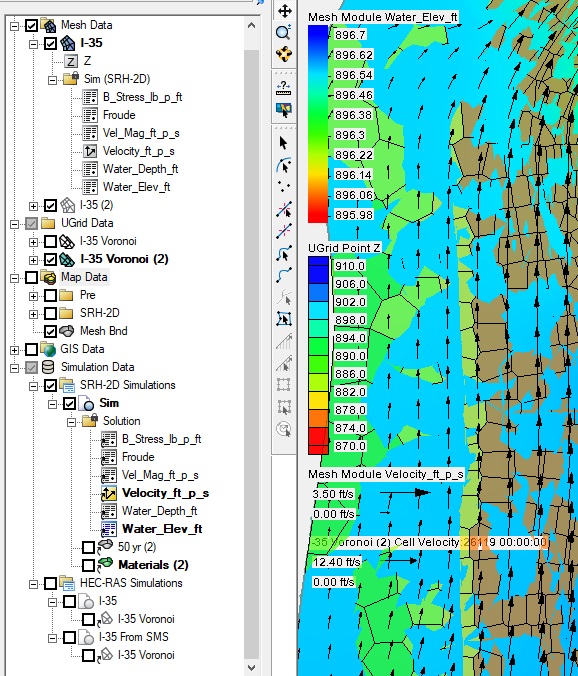
Have you ever wanted to compare model results between SRH-2D and HEC-RAS models? The SMS 13.2 interface allows you to view both SRH-2D and 2D HEC-RAS results for the same model at the same time.

Say, for instance, that you have created an SRH-2D simulation in SMS and you want to compare results using HEC-RAS. First, if you do not have the project in both SRH-2D and HEC-RAS, you will need to create an HEC-RAS simulation in SMS and use it to export the SRH-2D mesh into a file format that HEC-RAS can use. Then you can import the mesh into HEC-RAS and set up the boundary conditions and other attributes of the simulation.

Comparing a SRH-2D and HEC_RAS simualtion

Once you have a completed simulation for both SRH-2D and HEC-RAS, you can import the results of the HEC-RAS simulation into the SMS project containing the SRH-2D solution. To do this, simply open the "*.p**.hdf" file generated by HEC-RAS in SMS. This will import the HEC-RAS solution into your SMS project. The HEC-RAS simulation solution will appear on a 2D UGrid.

There are many different comparison options available, a few are listed below:

  • The first comparison is often a quick visual check. Switching between the two models in the Project Explorer will let you make quick visual comparisons. You may need to adjust your contour display options to make this easier.
  • Using the Data Calculator, you can make a comparison dataset. Since the HEC-RAS solution will be on a UGrid and the SHR-2D solution will be attached to a 2D mesh, you may need to convert data to be in the same module in order to do this.
  • Observation Plots are another way to compare the models. You can plot the solutions from both models using the same observation coverage.

Try out comparing SHR-2D and HEC-RAS models in SMS 13.2 today!

Blog tags: 

Exporting Map Coverages in SMS

Do you have a map coverage with specific defined attributes in an SMS project that you would like to add to another project? There is a solution: starting in SMS 13.2 you can export your map coverage as a DMC file that you can import into another project.

For exmaple, say that you have defined a weir structure on an SRH-2D boundary condition coverage for your project. You could, conceivably, have a massive project with many different coverages, meshes, and simulations. If you, or a coworker, would like to use that weir with its defined attributes in another project, recreating the same weir would be inefficient. Instead, exporting just the weir coverage as a DMC file allows you to import the weir coverage with its feature objects and attributes into another project. This will save time for everyone involved in the project, streamlining the process.

There are three steps to export a map DMC:

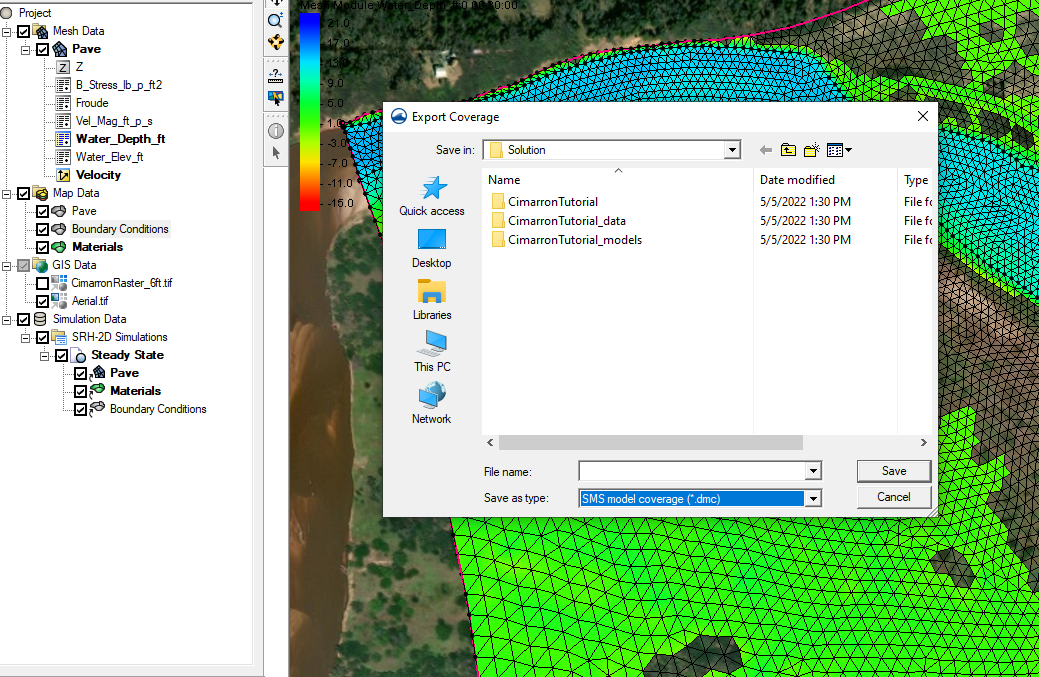
  1. Right-click on a coverage of your choice in the Project Explorer and select the Export command.
  2. In the Export Coverage dialog, change Save as type to be "SMS model coverage (*.dmc)".
  3. Save the DMC file.
Example of Exporting a Map Coverage as DMC File

The DMC file can now be imported into another project. Importing the DMC file will create a new map coverage in the project with all of the feature objects and attributes that were saved with the file.

It should be noted: Nearly all attributes in the coverage will be exported. The exception to this rule is that external files referenced by the coverage are not embedded in the model coverage file. An example of this would be an external tidal WSE source in a CMS-Flow BC coverage. The attribute would include the link to the file, but if the DMC file is read into a project on a different machine, the external file would not be in the same location, and therefore the association is automatically maintained.

It should also be noted that not all map coverage types can be exported as a DMC file. Certain older map coverage types do not have this option at this time.

Try exporting a DMC file and importing it into an SMS 13.2 project today!

Blog tags: 

Tips for Working with Virtual Machines

Have you installed GMS, SMS, or WMS (collectively referred to as XMS) on a virtual machine in your office? Using a virtual machine is often done in order to run multiple operating systems, consolidate computing resources, provide integrated disaster recovery, or a number of other reasons. XMS software can be installed on a virtual machine in order to fit your needs. Here are some tips for working with XMS when using a virtual machine.

Virutal machine

First, make certain that your XMS license is compatible with a virtual machine. Both local and flex license codes can be used with a virtual machine. However, local codes will not allow the software to be used by other machines. Older single-user locks cannot be used with a virtual machine.

When using a flex license, the virtual machine will need to have access to the local network in order for other machines to access the XMS license and use the software. Both the XMS application and the Aquaveo License manager need to be installed on the virtual machine.

When sharing files between a virtual machine and a host machine, pay attention to where XMS is running. XMS requires that all files be placed where XMS is installed. Therefore, you cannot save your project on the host machine and run them from the virtual machine if XMS is installed on the virtual machine. You will need to move the files to the virtual machine where XMS and XMS license is installed.

It should also be noted that some simulation runs and application processes in XMS will run slower on a virtual machine than running the same process directly on a physical machine. This is due to the nature of using a virtual machine. If there is a process that is taking an unusually long time, it is recommended that you try running the application on a physical machine.

If you are experiencing issues running XMS on a virtual machine, contact our technical support team and they will be happy to assist you.

Blog tags: 

Pages