SMS

Importing and Exporting Shapefiles

If you have data in GMS, SMS, or WMS that needs to be shared with another application, one of the easiest ways to share this data is through shapefiles. GMS, SMS, and WMS can all import and export shapefiles, though there are some differences between them. This article goes over some of those differences.

Importing Shapefiles

When you import shapefiles into GMS, SMS, or WMS, they will be loaded under the GIS module. Shapefiles can be imported just like any other file using the File | Open command, the Open File macro, or dragging the file icon on the interface. From there, you can use the conversion commands to move the shapefile data into other modules.

Exporting Shapefiles

Though GMS, SMS, and WMS have a lot of similarities they each vary from the other when it comes to saving a shapefile. In general DEMs, TINs, feature objects, and grids can be saved through the right-click menu in GMS; the file menu in SMS; and through both the right-click menu and file menu in WMS.

GMS
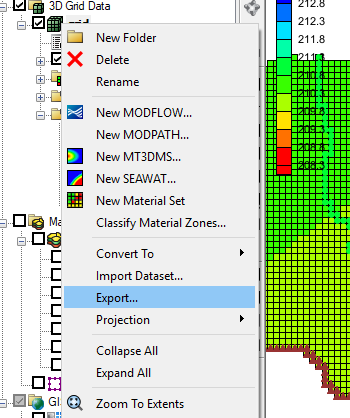
Export command

Shapefiles can be exported through the right-click menu.

  1. Right-click on the item in the Project Explorer and select Export to bring up the Export dialog.
  2. In this dialog you can change the "Save as type" to "Shapefile (*.shp)".

The following items can be exported as shapefiles.

  • TINs
  • 3D Grids
  • Feature Objects
  • DEMs
SMS

Shapefiles can be exported through the File menu.

  1. Select the item in the Project Explorer, then File | Save As to bring up the Save As dialog.
  2. In this dialog you can change the "Save as type" to "Shapefile (*.shp)".

The following items can be exported as shapefiles.

  • Scatter Sets
  • 2D Grids
  • Feature Objects
  • Raster Files
WMS

Shapefiles can be exported through the right-click menu and through the File menu.

  1. Select the item in the Project Explorer, then File | Save As to bring up the Save As dialog.
  2. In this dialog you can change the "Save as type" to "Shapefile (*.shp)".
  3. Alternatively, you can right-click and select Save As to bring up the same dialog.
The following items can be exported as shapefiles.
  • TINs
  • 2D Grids
  • Feature Objects
  • DEMs

Now that you know a little more about using shapefiles in XMS, try using them in your GMS, SMS, or WMS projects today!
Blog tags: 

Understanding Projections vs. Reproject

Have you ever wondered what the difference between projection and reprojection is? Have you ever needed to convert a projection from one type to another in GMS, SMS, or WMS (collectively known as XMS)? The use of projections in WMS can be confusing, so the following should provide further clarification.

Specifying Projections

Projections can be associated with individual data objects, either in the object data file itself or in an associated *.prj file. If XMS cannot find a projection, the object will be left as "no projection," or, when new objects are created, XMS will assign the display projection to it. You can specify an object's projection by right-clicking on it and selecting Projection. Note that this projection must be the same as the original projection of the data; specifying an incorrect projection will result in data issues.

Reprojecting on the Fly

"Reprojecting on the Fly" occurs when datasets or objects from multiple projections are loaded into a project, where the x and y values would not otherwise overlap (i.e., the data would be displayed in two or more distinct locations). The different projections for these data will be "reprojected on the fly" to match the display projection such that the data objects will line up. Note that this does not change any *.prj files or the projections that are set for each object; it is an automatic function internal to XMS used for display purposes.

Converting a Projection

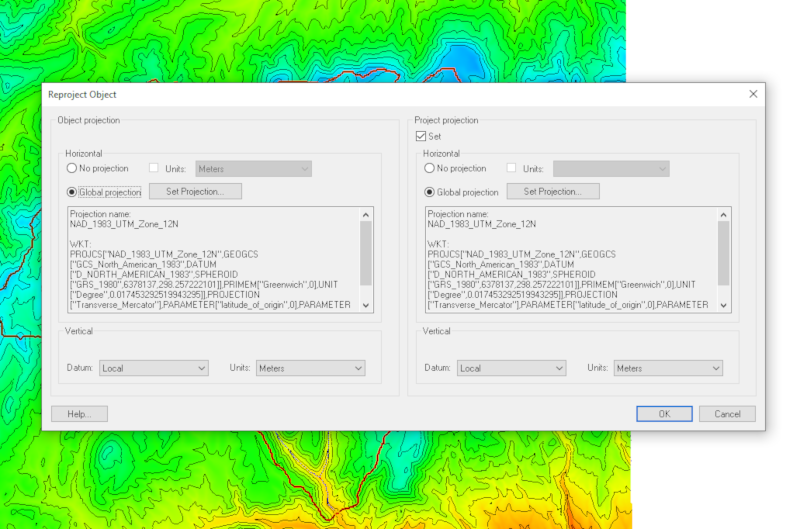
If you need to convert from one projection to another, this can be done by right-clicking on it and choosing Reproject. To use this command, the data must first have the correct projection specified. After choosing Reproject, the command will prompt the user to select a new projection, the data will be converted to the selected projection. If a *.prj file is associated with the object (such as a TIFF), reprojecting the object will change the *.prj file. Reprojection on the fly is usually sufficient for most applications. Please note that there are some limitations for reprojecting.

Reporject Dialog Example

Once the datasets are referencing their projection correctly, XMS should reproject them on the fly to match your display projection. If you don't have a display projection set, you can do so by selecting the Display menu and choosing Projection. At that point, if you would like to reproject your scatter(s) into the same projection as the display projection, you would be able to do so.

Now that you see the differences between projection vs. reproject try them out in XMS today!

Blog tags: 

Tips for Feature Stamping

Have you ever needed to add an abutment, embankment, or other feature to your mesh and found it a struggle? We have some good news for you: SMS includes a function called Feature Stamping that is useful for this exact situation.

Feature stamping allows you to add man-made structures to an already created mesh by means of a stamping coverage.

Feature Stamping Example

You can find out more about this process in this wiki workflow.

There are, however, a few items to keep in mind when attempting to use the feature stamping tools. In this post, we’ll cover some of the most common, and how to troubleshoot them.

Make a High Quality Mesh

In order for feature stamping to be the most effective, it is necessary to enter them into a mesh that is already stable. Some items to look for include:

  • Making sure the mesh has enough detail.
  • Checking that the spacing between vertices isn’t too extreme in any portion.
  • Making use of the Redistribute Vertices tool.

You can find much more about creating quality meshes on here our blog.

Avoid Disjointed Vertices

Disjointed vertices are points in the scatter that have not been connected to triangles or quadrilaterals in the mesh. Feature stamping will fail if there are any disjointed vertices in the mesh.

There are two options for fixing this:

  • Find and delete all of the unconnected vertices.
  • Re-triangulate the mesh.
Keep the Stamping Features Short, Linear, and Independent

Feature stamping is usually linear, following a centerline.

If the structure is too large, or crosses over with other structures, it often has problems properly integrating with the mesh.

You can find examples here of when features are considered to be overlapping.

As long as your stamping features are reasonable in size and don’t interfere with each other, you should be able to successfully stamp your man-made features into the mesh.

Feature stamping is a very useful, but sometimes under-utilized, tool. Try out the feature stamping function in SMS today!

Blog tags: 

Best Practices for 2D Hydraulic Modeling

In SMS, designing a good 2D hydraulic model from the start gives the best results. A poorly designed model can give bad results, cause model errors, or even keep the model from converging. And while it may seem easy at first to design a good model, there are plenty of potential pitfalls that can come up if you are not careful.

The following tips, broken down into five areas, can help improve any model.

Terrain Data

Pay attention to your terrain data. You can't set up a good model without a good foundation, and terrain data is your foundation. There are four things you will need to spend time getting right:

  • Represent hydraulic controls accurately
  • Make sure you include channel bathymetry
  • Add breaklines where needed
  • Finally review the terrain surface for missing features
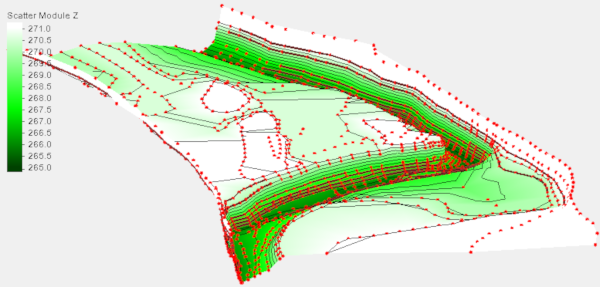
Terrain review
Mesh Development

Use an appropriate number of elements: size does matter, more is not always better. This is mainly because the time your model takes to render is a significant factor for any project. Element length should generally be equal to or greater than the flow depth, except for limited areas such as piers. When elements are too small, waves can form skewing the model results.

Quadrilatereal elements in meshes are often more stable than when using triangular elements. Once you have set your number of elements and length, confirm that hydraulic controls are represented in the mesh.

Lastly, review your mesh for quality.

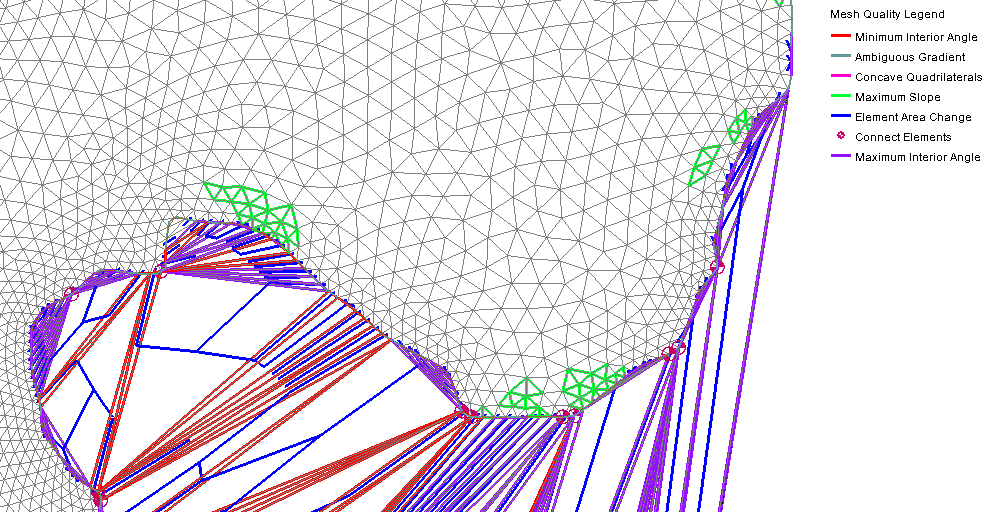
Mesh quality review
Boundary Conditions

When determining the boundaries of your model, you will need to find two things. First look for the most constricted area when determining model limits. Second, find the furthest usable boundary location from the area of interest. A good rule of thumb for rivers: two floodplain widths up and downstream. Note that the width of the mesh should be greater than the maximum flood width.

Lastly, perform sensitivity analysis on boundary conditions.

Material Roughness

Be aware that Manning's n values for 2D model can be lower than 1D models. Be sure to calibrate your model. Essentially check your results to see if they are reasonable.

Model Execution and Review
  • Use the largest time step possible that gives you continuity and stability ( i.e. while still achieving a good solution).
  • Use monitoring points to verify steady simulation.
  • Use monitoring lines to verify continuity.
  • Review convergence parameters to confirm conservation of mass.

Following these tips can improve any model that uses a 2D mesh. Try them out in SMS today!

Blog tags: 

Pages